Tuesday, January 10, 2012

7 Dots - Newest Collection 'Wonderland'

Evening all

I want to share with you these amazing papers from 7 Dots Studio, do yourself a favour and click on this link and view them they are divine, my favourite paper from this range is


Follow the Rabbit


Look out for a kit from me coming in the near future which will feature their 'Elise Rebel' collection, loving the bright colours of this range. This kit will be a showcase of what you can do with these gorgeous bright papers.


xx Lou

The Princess and the Frog

Hiya

Two days and two blog posts, MOJO is on fire!!!
This Layout has been completed for the Mad about Scrappin January Challenge, you need to use 3+ photo's. I dug out these photo's of Olivia back on her 3rd Birthday, she really loves this frog.
I was able to shop at Mad about Scrappin over the weekend and was able to pick up these yummy papers from Lily Bee the new range 'Head over Heels' love this colour combo.


Of course I could not resist to include some deliciousness from D-Lish Scraps as well, some resin flower centres, flowers, Forget me Not flowers and Blue Linen Sassafras alphas...
Here is some close ups


Well I hope you like

xx Lou


Monday, January 9, 2012

No Such Joy

Hiya

Hope you are all having a great new year,
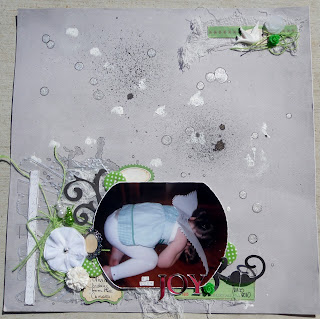
I have found some much needed MOJO and have whipped up this Layout for the 123 Challenge Blog
You needed to have meet 3 criteria
Use the word JOY
have paint splats/ misting
and use Silver

I love this series of photographs that I took of Olivia in Christmas 2010, she started with a gorgeous smile but ended up in a heap on the flower refusing to take anymore photo's. My Baby (she is nearly 4) is very temperamental at times...

I started with the B side of Teresa Collins 'Carolina Breeze' can I say how much I love this paper range, love grey and yellow together. I then grabbed my splat TCW template and used my iridescent medium to give it the silver effect, this stuff is soooo shiny. I then added some Gesso, Black Magic Glimmermist and finished off with some basic pen outlines.


the next thing I did was grab my Christmas Present from my Hubby, my BIG SHOT!!!! I  embossed a piece of acetate, then went looking through my stash thinking what else can I put on this LO, then I decided to go with lime green with the silver. Once this was decided this all ended up coming together really quickly for me. Lots on this page came from my D-Lish Scraps stash, the Velvet flower, carnation, pins, spotty buttons, resin flowers and bird.

The word JOY is actually a mirror word, hence my red shirt was being reflected in the photo... Ooops


anyways hope you like and be inspired to get out some green elements and pop them on a page today

xx Lou

Wednesday, January 4, 2012

Embossed Bottlecap Tutorial

Hiya All

Here is a tutorial I did for D-Lish Scraps last year, realised I never shared it on my Blog so thought would copy it across, hope this inspires you to get creative today :D

Embossed Bottlecaps

I wanted to show you all something that you can do with your DIY Bottle Caps from D-Lish Scraps, here I have coloured the Bottle Cap with embossing powder, so it blended with the tone of the card.
First step in this process is to gather your materials, you will need a heat gun, embossing powder, Bottle Caps, Versamark or similar clear ink, tweezers, 1 inch hold punch, paper and glue.
Take your Bottle Cap and Versamark Ink, cover the entire surface of the Bottle Cap, concentrating on the edges (this is what you will see)
Now either use an embossing tray or a scrap piece of paper, cover the inked Bottle Cap with the embossing powder.
Now you need to heat set the embossing powder, you need to be careful here, metal gets VERY HOT. I tap off the excess powder and then use my heat gun to set the powder, use tweezers to handle the Bottle Cap or you will burn yourself.
Let the Bottle Cap, cool completely before you start the next step, you will need to either punch a 1 inch circle or cut out from your choosen image.
Glue this to the centre of the Bottle Cap with a strong quick drying glue to ensure your paper does not curl, you could also use JAC paper or similar
Wait for the glue to dry and then cover your centre with the supplied Epoxy Resin cover
Now you have your own unique embellishment, to perfectly match whatever you are currently creating.

Thanks for looking today and I love feedback

xx Lou