Tuesday, November 20, 2012

Glitz Sample


Glamour Girl

Thursday, November 1, 2012

Glitz for Bella Paperie

Lollipop Fun


I created this layout using "Hello Friend" papers from  Glitz Design. The title lettering is a Memory box die and the Hot Air Balloon is a Fancy That Die. Splat template from The Crafters Workshop which I inked with Tea Dye Distress Stain. I was very eclectic with this page, using lots of paper, Basic Grey and I even punched out the packaging from the Pink Paislee 'Portfolio' Polaroid frames, and I also used one on the page.  I also used a definition sticker from Heidi Swapp.


I am in Love with this page of my cute daughters having a lollipop at the dinning room table,

TFL Lou

Wednesday, October 31, 2012

A couple from the October Retreat

Hope you are all well, just popping in today to show you a couple of layouts from the October Retreat with Bella Paperie.
 

Everyday Moments

 
This page was completed using papers from Carta Bella 'Alphabet Junction' the colours really matched the girls in the bath together.  I love to scrap everyday and this photo is a shot of them both being treated for the dreaded creepy crawlies - Nits....
Apart from the paper, I used distress ink with my splat mask, and various embellishments from D-Lish Scraps
 

Fun Together

 
This page was using up the remainder of papers that I had from a class I took in September with my bestie Amanda Lawrence, who taught the class at Bella Paperie.  This range is 'Butterfly Kisses' by Kaisercraft. To create the lines I ran a hole piercer tool over ink pads then over the page, I complimented this colour with punch outs of the paper and matching buttons. Of course I could not resist using some yummy washi from D-Lish Scraps as well.
 
TFL Lou

Saturday, October 27, 2012

I Love you Funny Face

Hi my Lovelies
 
I am back with one of the Layouts I completed at the Bella Paperie Retreat.
I had started this page at home but was lacking inspiration but there is always plenty of it around when you are in a room full of creative women.  These are Lilybee papers I had in my stash for quite awhile now but the colours were perfect for the selfies of my daughter and myself.
 
 
I combined these fake Polaroids with negative punch outs from cardstock, I also inked through two different masks to create some texture in the background.  I had only that week picked up some sequins from D-Lish Scraps and I glued these on with my glue pen.
 

The washi, Star and wooden buttons and the camera charm are from D-Lish as well.
 
TFL Lou

Thursday, September 6, 2012

MME - Sweetest Thing

Cute

Have I ever told you guys how much I love Instagram, well I took this photo of my youngest daughter while waiting for my mother at an ultrasound appointment, she was looking pretty adorable.
 
Debra from Bella Paperie asked if I wanted to use some of the yummy papers from My Minds Eye, I chose the range 'Sweetest Thing with the Tangerine colours.


The background paper is Divine, love woodgrain!!!! I backed it with some yellow Bazzill to break it up and created long pennants out of the patterned papers.  This is another page which came together easily for me using the elements within the range except the chipboard heart is from Collections and the washi tape is from D-Lish Scraps.


Hope you like this page and thanks for looking

Lou

Wednesday, July 11, 2012

Cakewalk for Bella Paperie

Moments in Time

This Layout was created using the new "Cakewalk" range from October Afternoon. Funnily I have used a Christmas 2011 photo of the girls with this paper which is really a party range, but I think it works perfectly.


This was a quick and easy page to create for Bella Paperie. The background paper had all of this faux stitching with a star in the top right hand corner, which I cut out carefully as I wanted to use this again in the embellie clusters. I used stars from the flower stacks as well as bits from the Doo-dads, to finish off this page. The chipboard was inked in Pinecone and was from Imaginarium Designs.


Here is a shot of the layering of the stars on the side of the photo.

TFL Lou

Thursday, May 31, 2012

Grade Two

Grade Two


I created this layout using "Note to Self" paper range by Echo Park, another sample that I created for Bella Paperie. This paper, covered in numbers, was perfect for scrapping Daphne's school photos. Can I tell you how much I love this range, so many little elements on the paper that you can cut out and use, just YUM!!!


A little close up of the embossed Jenny Bowlin Coordinations paper that I sanded, I also added D-Lish Scraps washi, journal tag and crocheted flower.  The Martha Stewart Doiley was altered with Antique Linen Distress Stain and finally the title alphas are Jillibean corrugated alphas.

TFL Lou

Tuesday, March 27, 2012

Abit of eye candy

Hi All

I am back with a little number I created as a sample for my Local Scrapbooking Store Bella Paperie I have used the new papers from Dear Lizzy 'Neapolition'.  I created a fake poloriod and layered some papers and dripped some glimmer across the page, love how this turned out,


and here is a close up to show the layering


Thanks for looking, leave me some love
xx Lou

Monday, March 26, 2012

Prairie Hill Sample

Bright Sunshiny Day

Debra from Bella Paperie asked me to create a sample page with papers from Pink Pailee's 'Prairie Hill' the colours in this paper really suited some older photo's I had from the eighties. The particular photo I ended up using is the only photo I have of my family together prior to my parents getting divorced.


I created a faux notepaper out of one of the sheets as well as created a handmade bottlecap embellishment, I used distress embossing powder on the bottlecap to change the tone, here is a link to the tutorial on how I do this. I wanted to keep the focus of this page on the photo as I then made a pin wheel and added a few embellies to keep it simple.


The wooden buttons and washi tape used on this page was purchased from D-Lish Scraps


TFL Lou

Thursday, March 22, 2012

Fab 'U' lous

Hi All

Here is a sample I created for my local Scrapbooking store Bella Paperie, I used some yummy papers from Simple Stories


and I then embellished the page with some flowers, buttons and charms from D-Lish Scraps, here is a close up of the embellie clusters.


That bunny cameo was perfect for this layout as my daughter is wearing her Easter bonnet.


I am in love with machine sewing on my layouts at the moment.


and I still love my string and doilies as well ;)

Hope you like

xx Lou

Sunday, March 18, 2012

Daphne and Poppy

Hi all,

Been a long time coming but here is the layout I promised last time, it's a very special picture taken of Daphne and her grandfather playing together. Richard passed away in 2008 and I have hesitated to scrap photo's of them together until now. I wanted the page to be special and I think that I have accomplished that with this Layout.


Here is some close ups of all the D-Lish Scraps, that I used on it,


Gorgeous 'Forget me Nots' and a teal lollipop from Charms Creations

Here I used a glass cabochon over the patterned paper with a resin rose and another forget me not,


Here is one of the antique brass charms that D-Lish stock,


Who knew simple wooden buttons could look so good,


love using the dressmakers safety pin with charms,


a carnival ticket,


last but not least, some of the 9cm triple head pins, with a Charm's Creation Clay button.

Hope you like this page, I spent a long time making each part unique.

xx Lou


Wednesday, February 15, 2012

Sisters

This month at Mad about Scrappin, the facebook challenge is to create a LO with a patterned paper base using paper strips and a one word title. I think I have done a great job considering, I have been laid up in bed for the best part of a week now.


I pulled out my pack from Crate Paper 'Random' and used 3 papers that complemented each other, used some of my favourite Distress Stains 'Old Paper' and black thread on my sewing machine to create this little number. Here is a close up of the embellie cluster,


I used a gorgeous new peacock charm, covered in tattered angels 'Glam' with new some new flowers from D-Lish Scraps, I wanted to keep it simple and focus on my darling girls.

Will be back when I am feeling better, to show you the first LO I have completed of my father in law and my eldest daughter, since he passed away nearly 4 years ago.
Til then
xx Lou


Tuesday, January 10, 2012

7 Dots - Newest Collection 'Wonderland'

Evening all

I want to share with you these amazing papers from 7 Dots Studio, do yourself a favour and click on this link and view them they are divine, my favourite paper from this range is


Follow the Rabbit


Look out for a kit from me coming in the near future which will feature their 'Elise Rebel' collection, loving the bright colours of this range. This kit will be a showcase of what you can do with these gorgeous bright papers.


xx Lou

The Princess and the Frog

Hiya

Two days and two blog posts, MOJO is on fire!!!
This Layout has been completed for the Mad about Scrappin January Challenge, you need to use 3+ photo's. I dug out these photo's of Olivia back on her 3rd Birthday, she really loves this frog.
I was able to shop at Mad about Scrappin over the weekend and was able to pick up these yummy papers from Lily Bee the new range 'Head over Heels' love this colour combo.


Of course I could not resist to include some deliciousness from D-Lish Scraps as well, some resin flower centres, flowers, Forget me Not flowers and Blue Linen Sassafras alphas...
Here is some close ups


Well I hope you like

xx Lou


Monday, January 9, 2012

No Such Joy

Hiya

Hope you are all having a great new year,
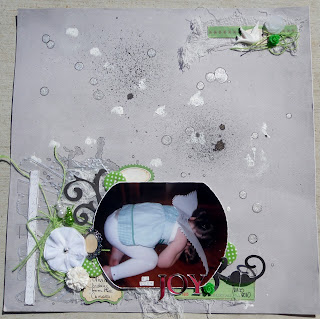
I have found some much needed MOJO and have whipped up this Layout for the 123 Challenge Blog
You needed to have meet 3 criteria
Use the word JOY
have paint splats/ misting
and use Silver

I love this series of photographs that I took of Olivia in Christmas 2010, she started with a gorgeous smile but ended up in a heap on the flower refusing to take anymore photo's. My Baby (she is nearly 4) is very temperamental at times...

I started with the B side of Teresa Collins 'Carolina Breeze' can I say how much I love this paper range, love grey and yellow together. I then grabbed my splat TCW template and used my iridescent medium to give it the silver effect, this stuff is soooo shiny. I then added some Gesso, Black Magic Glimmermist and finished off with some basic pen outlines.


the next thing I did was grab my Christmas Present from my Hubby, my BIG SHOT!!!! I  embossed a piece of acetate, then went looking through my stash thinking what else can I put on this LO, then I decided to go with lime green with the silver. Once this was decided this all ended up coming together really quickly for me. Lots on this page came from my D-Lish Scraps stash, the Velvet flower, carnation, pins, spotty buttons, resin flowers and bird.

The word JOY is actually a mirror word, hence my red shirt was being reflected in the photo... Ooops


anyways hope you like and be inspired to get out some green elements and pop them on a page today

xx Lou

Wednesday, January 4, 2012

Embossed Bottlecap Tutorial

Hiya All

Here is a tutorial I did for D-Lish Scraps last year, realised I never shared it on my Blog so thought would copy it across, hope this inspires you to get creative today :D

Embossed Bottlecaps

I wanted to show you all something that you can do with your DIY Bottle Caps from D-Lish Scraps, here I have coloured the Bottle Cap with embossing powder, so it blended with the tone of the card.
First step in this process is to gather your materials, you will need a heat gun, embossing powder, Bottle Caps, Versamark or similar clear ink, tweezers, 1 inch hold punch, paper and glue.
Take your Bottle Cap and Versamark Ink, cover the entire surface of the Bottle Cap, concentrating on the edges (this is what you will see)
Now either use an embossing tray or a scrap piece of paper, cover the inked Bottle Cap with the embossing powder.
Now you need to heat set the embossing powder, you need to be careful here, metal gets VERY HOT. I tap off the excess powder and then use my heat gun to set the powder, use tweezers to handle the Bottle Cap or you will burn yourself.
Let the Bottle Cap, cool completely before you start the next step, you will need to either punch a 1 inch circle or cut out from your choosen image.
Glue this to the centre of the Bottle Cap with a strong quick drying glue to ensure your paper does not curl, you could also use JAC paper or similar
Wait for the glue to dry and then cover your centre with the supplied Epoxy Resin cover
Now you have your own unique embellishment, to perfectly match whatever you are currently creating.

Thanks for looking today and I love feedback

xx Lou